Built-in Chromebook Tools for Dyslexia
Students with dyslexia struggle with foundational academic tasks like reading and writing that can hinder their progress and lower their self-confidence—and it’s not uncommon. According to the Yale Center for Dyslexia & Creativity, “Dyslexia affects 20 percent of the population and represents 80–90 percent of all those with learning disabilities. It is the most common of all neuro-cognitive disorders.” Fortunately, since so many schools now provide a Chromebook for every student, there are free and easy-to-use assistive technology tools that are already built into every Chromebook. You just have to know where to look!
Two of the most powerful assistive technologies for dyslexia are text-to-speech and dictation. With built-in Chromebook tools, these can be accessed without adding a Chrome extension or using any third-party programs.
ENABLE ACCESSIBILITY FEATURES
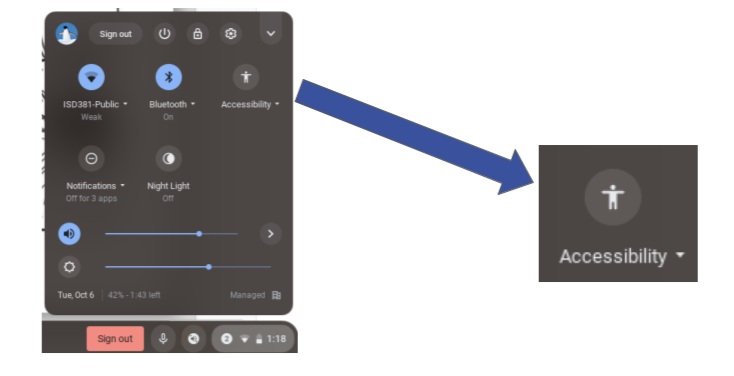
Click on the time in the bottom right corner of your screen and a menu will pop up. If you don’t see the accessibility icon, you’ll need to enable it. In order to do this, click on the gear icon for settings. Now that you are in the settings, navigate to the “advanced” menu on the left-hand side and then select “accessibility.” Toggle accessibility features to the “on” position.
Keep in mind that some school IT departments might have accessibility features locked down and you’ll need to contact them to make them available.
SELECT-TO-SPEAK
Select-to-Speak is Chromebook’s built-in and customizable text-to-speech program. To enable this feature, simply, click the accessibility icon in the Chromebook menu and then click select-to-speak. You should now see the icon in your Chromebook shelf at the bottom of your screen. In order to use it, either click the icon and then select the text you want read or select your text and then hit the magnifying glass key + the “S” key on your keyboard. For full instructions on how to use Select-to-Speak, visit Google Support.
How can text-to-speech help?
Reading test questions
Reading directions
Researching paper
Proofing their writing
Free reading for pleasure
Please note, there is also a screen reader program called ChomeVox that is an accessibility program for the visually impaired, which is not the best choice for basic text-to-speech for learning disabilities.
DICTATION
To enable the dictation tool, just go to the accessibility menu and click on “Dictation.” You should now see a microphone icon on your Chromebook shelf. Once there, all you have to do is click the dictation icon and speak in order to enter text into any text field, such as a YouTube search bar or for spelling help—I might be able to say onomatopoeia, but I know I can’t spell it!
How can dictation help?
Spelling words
Short answer
Final draft
Composing
Writing faster
Brainstorming
Note taking
However, if you pause for two seconds, the microphone turns off. This isn’t the best option if you are trying to compose an essay and frequently needing to pause and think. For long-form dictation, it is better to use the Google Docs built-in Voice Typing. This feature can be found under the tools menu within Google Docs and can only be used within that program.
Because there are commands to learn, such as “insert period” and “delete last word,” there is a bit of a learning curve with dictating writing assignments. Visit Google Support for a full list of commands.
For more information about built-in Chromebook accessibility tools and to download their infograpgh poster, visit CALL Scotland.


